スマホアプリにおいて、設定画面は必須の画面ですよね。
今回は、iPhone本体の設定画面ライクのイイ感じの設定画面を作る方法をご紹介します。
この記事では、こんな設定画面を作ってみます。
iPhoneの言語と地域の設定画面の一部をマネしてみた画面です。
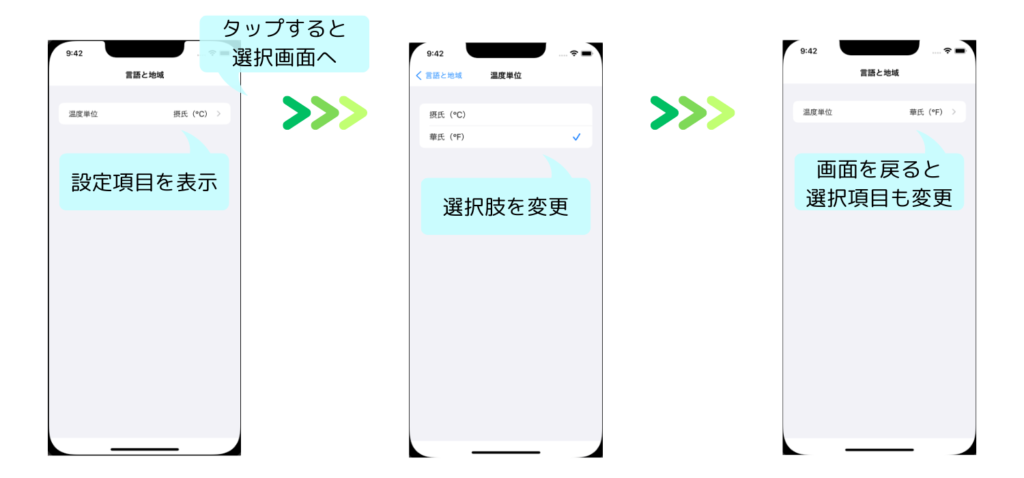
この記事では、Navigation Controllerでの画面遷移の方法や、Table Viewの使い方、また画面遷移時に値を受け渡す方法など、様々な便利な要素が登場します
ボリューミーな内容になるので、この記事では、細かい説明は後回しにして、とりあえず上のツールを作ることにフォーカスしています。
各要素の詳細な解説は、それぞれの登場箇所へ、解説記事へのリンクも貼っていますので、興味のある方は、ぜひ、それぞれの記事もご覧になってください。
Storyboard上で画面を作る
さっそく設定画面ツールを作っていきましょう!
まずはStoryboard上で、画面を作りましょう。
Storyboard上の画面は、以下の流れで作っていきます。
- 2画面を配置し画面遷移の設定をする
- 1画面目を作る
- 2画面目を作る
2画面を配置し画面遷移の設定をする
最初に、ベースとなる2つの画面を配置します。
また、画面遷移の設定をするため、Navigation Controllerの適用もします。

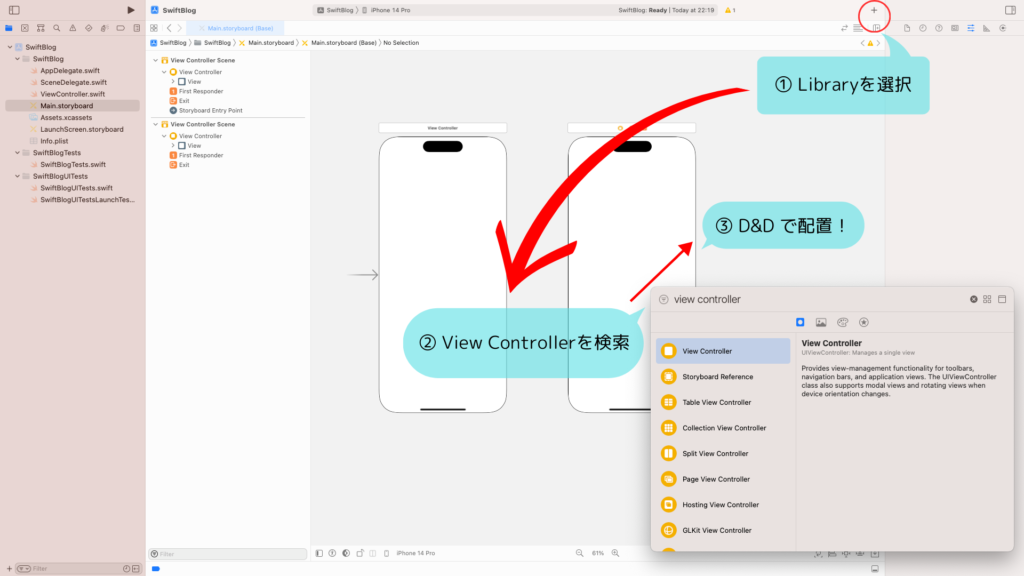
以下のように、LibraryからView Controllerを検索します。
Storyboard上に2つのView Controllerを配置しましょう。
画面遷移をするため、Navigation Controllerの設定をします。
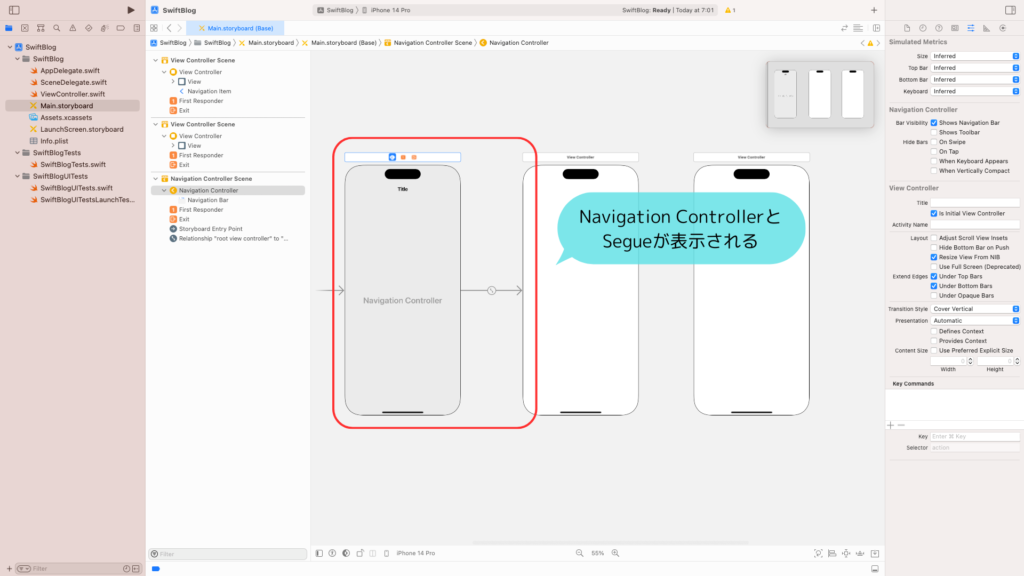
1画面目を選択し、Navigation Controllerを適用しましょう。
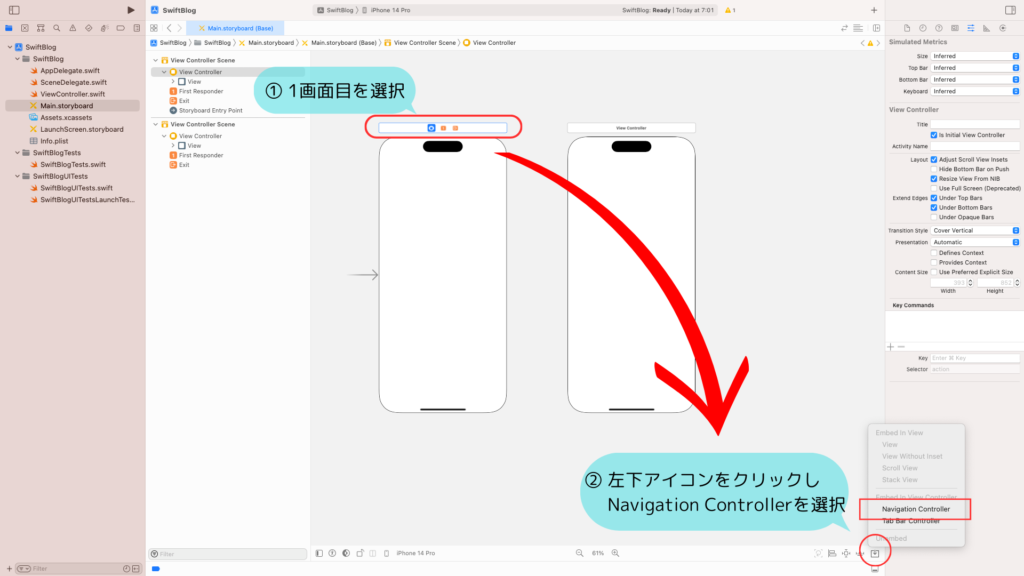
Navigation Controllerが表示され、Segue(矢印の線)が接続されればOKです。
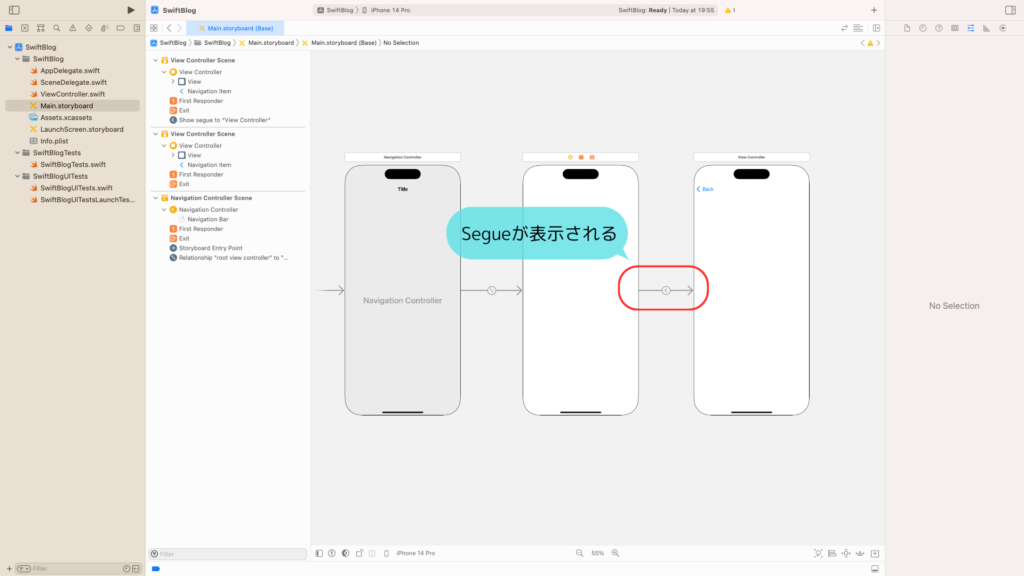
1画面目から2画面目へ画面遷移をする設定もしていきます。
1画面目のView Controllerを選択し、Controlキーを押した状態で、2画面目まで引っ張り、離します。
選択肢が表示されるので「Show」を選択しましょう。

1画面目と2画面目の間にも、Segueが表示されることを確認しましょう。
Segueが表示されたら、SegueにIDをつけておきます。
Segueを選択し、Attribute Inspectorを開きます。
Identifierへ「next」と入力します。

これで、2画面の設置と、画面遷移の設定は準備完了です!
1画面目を作る
続いて、1画面目を作っていきます。
このような画面が表示されるように、画面を準備していきましょう。
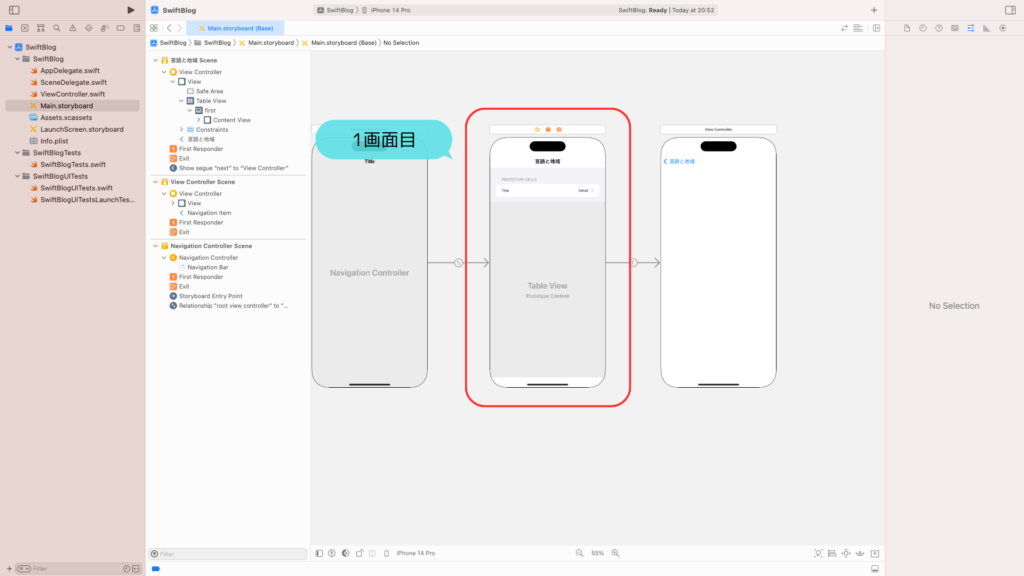
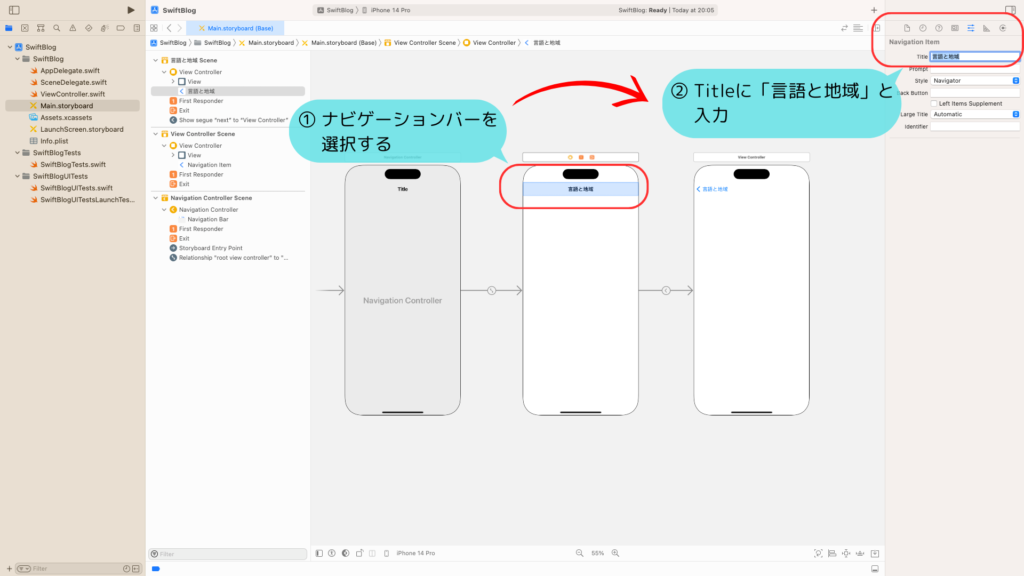
ナビゲーションバーを選択します。
Titleに「言語と地域」と入力しましょう。Storyboard上のナビゲーションバーにも、「言語と地域」と表示されればOKです。
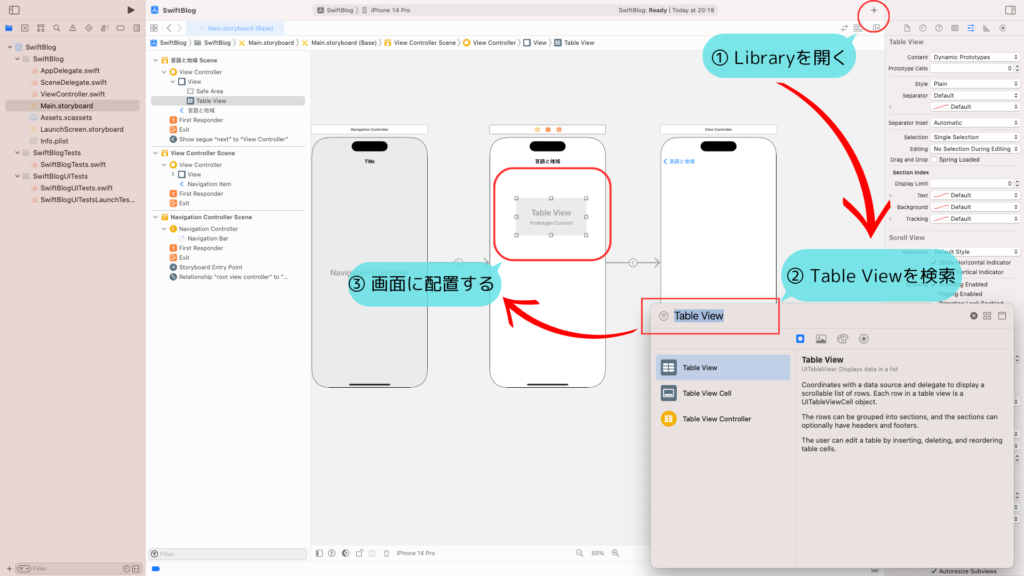
選択項目の画面を表示するためには、「Table View」という要素を使用します。

Library から Table Viewを検索し、View Controller上へ配置しましょう。
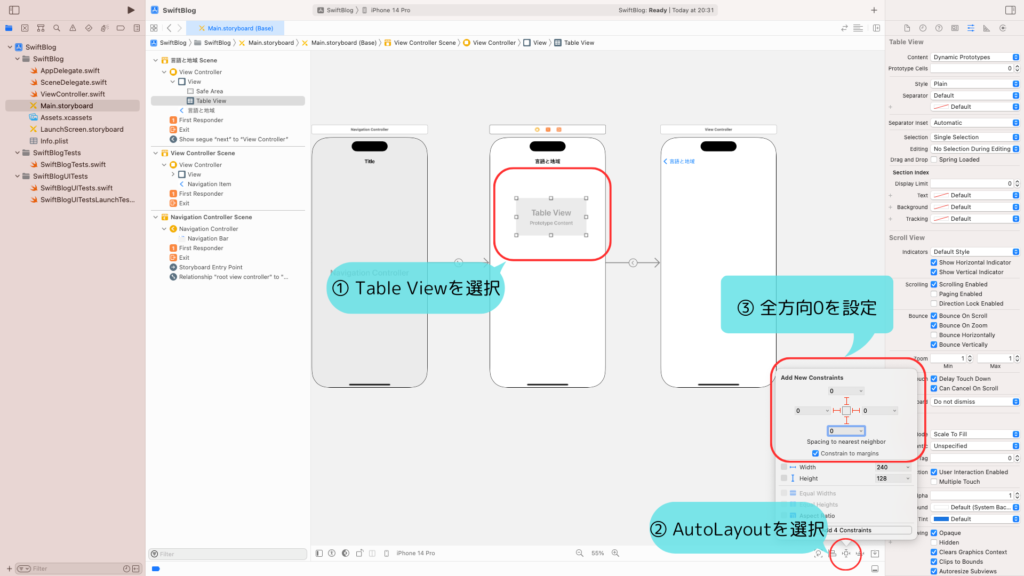
配置したTable ViewへAutoLayoutの制約をつけていきます。
上下左右全てスペース0にして、画面いっぱいに広げましょう。
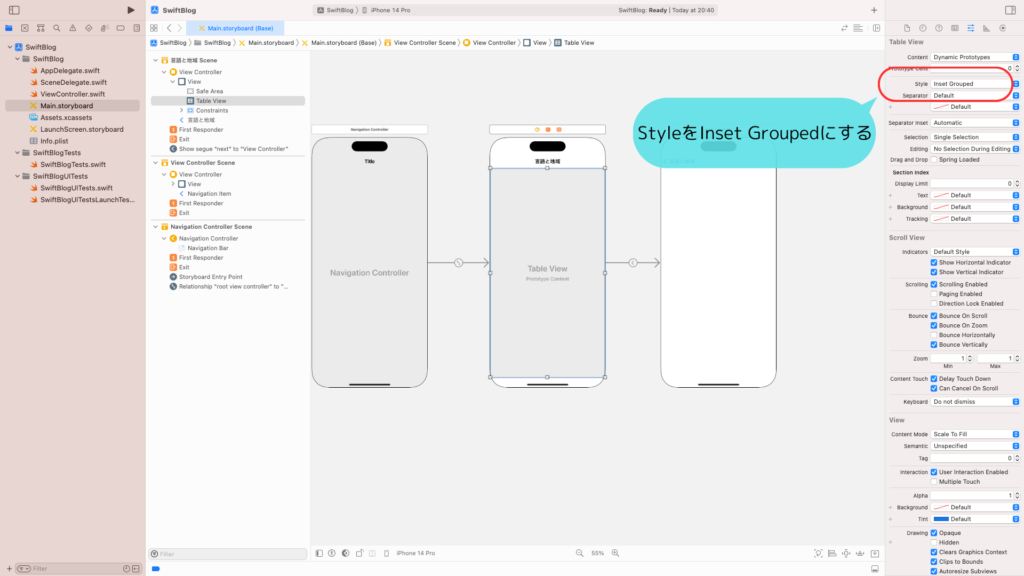
配置したTable Viewを選択して、Attribute Inspectorを開きましょう。
Table ViewのStyleを「Inset Grouped」にします。(この設定により、iPhoneみたいな画面になります。)
Library から Table View Cellを検索し、Table Viewの上へ配置しましょう。
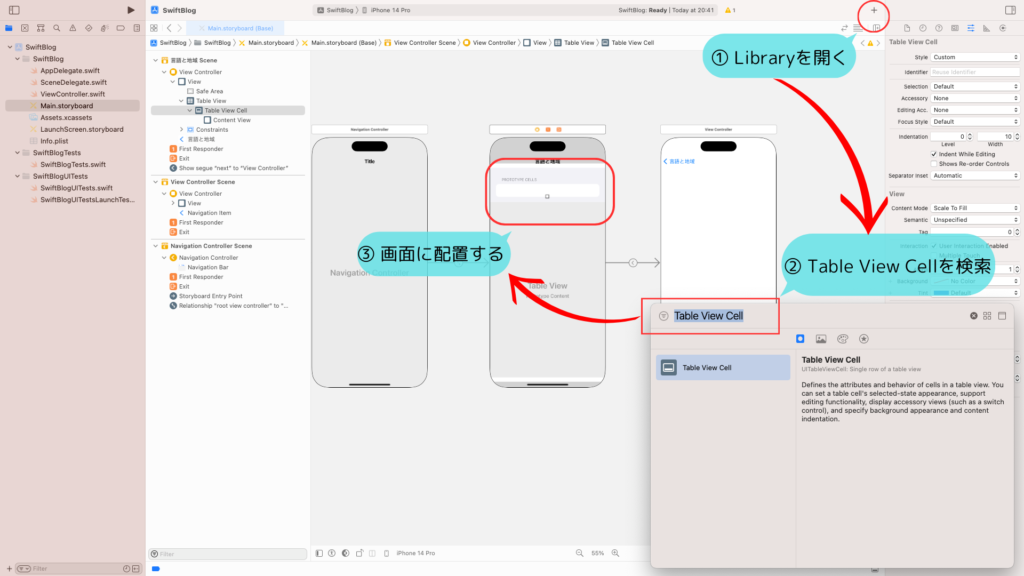
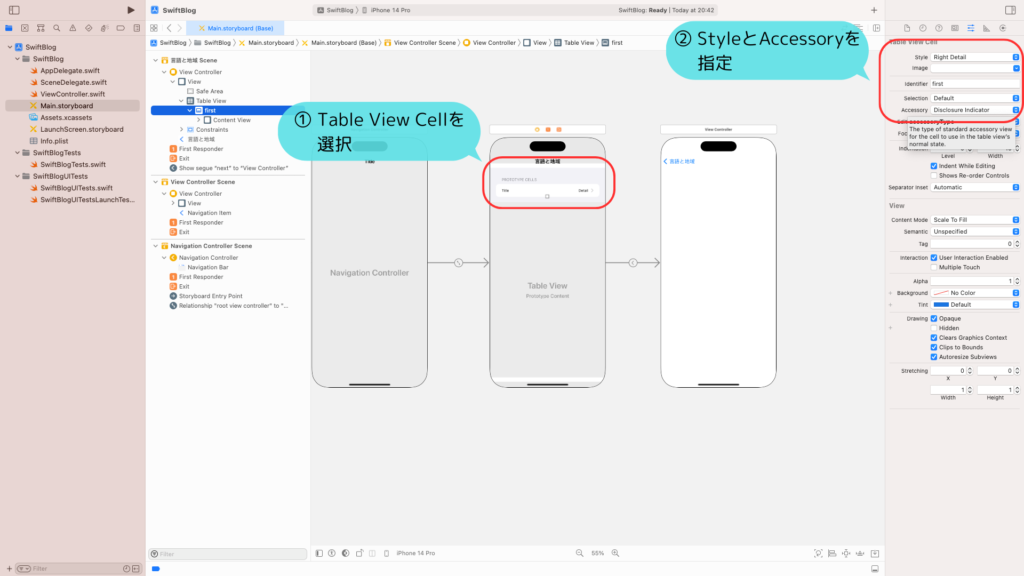
配置したTable View Cellを選択して、Attribute Inspectorを開きましょう。
Identifierへ「first」と入力します。

選択項目のセルは、右側に「摂氏(℃)」という、選択中の項目が表示されます。この表示ができるように設定しましょう。
Styleを「Right Detail」にします。
また、Accessoryを「Disclosure Indicator」にします。
これで1画面目は完成です!
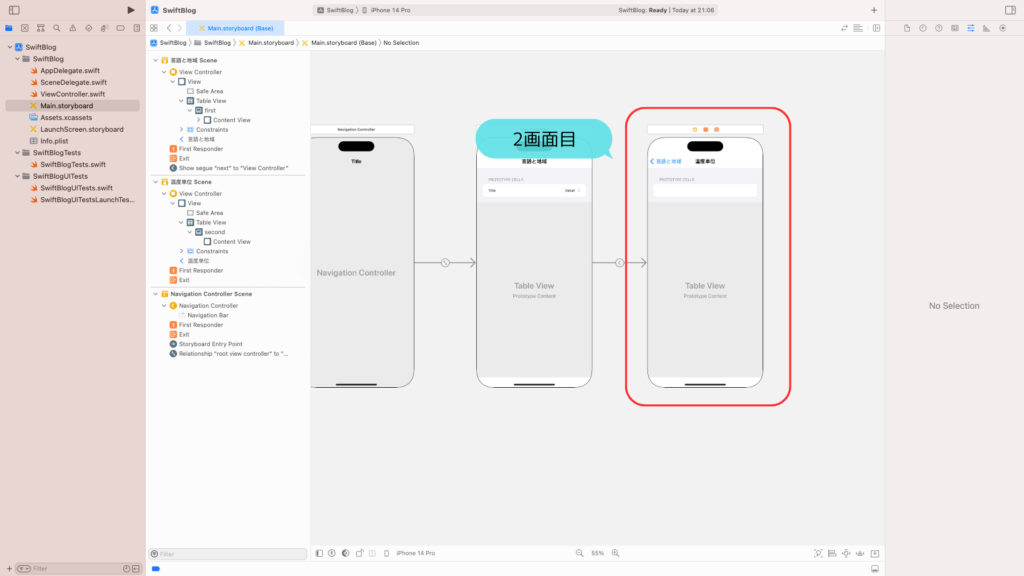
2画面目を作る
2画面目も作っていきましょう。
このような画面を作成します!ほとんど、1画面目と同じような作業です。
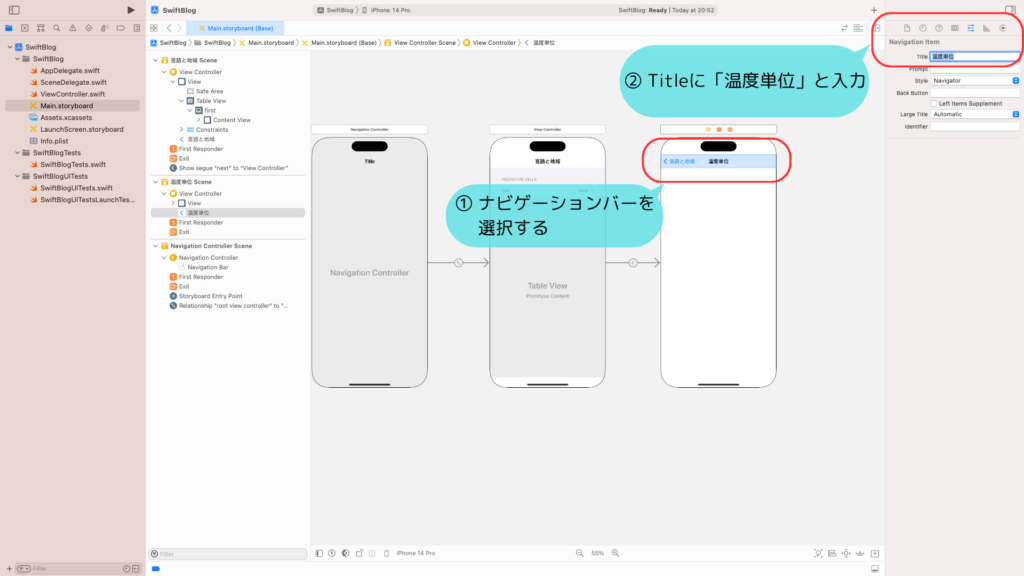
ナビゲーションバーを選択します。
Titleに「温度単位」と入力しましょう。
Storyboard上のナビゲーションバーにも、「温度単位」と表示されればOKです。
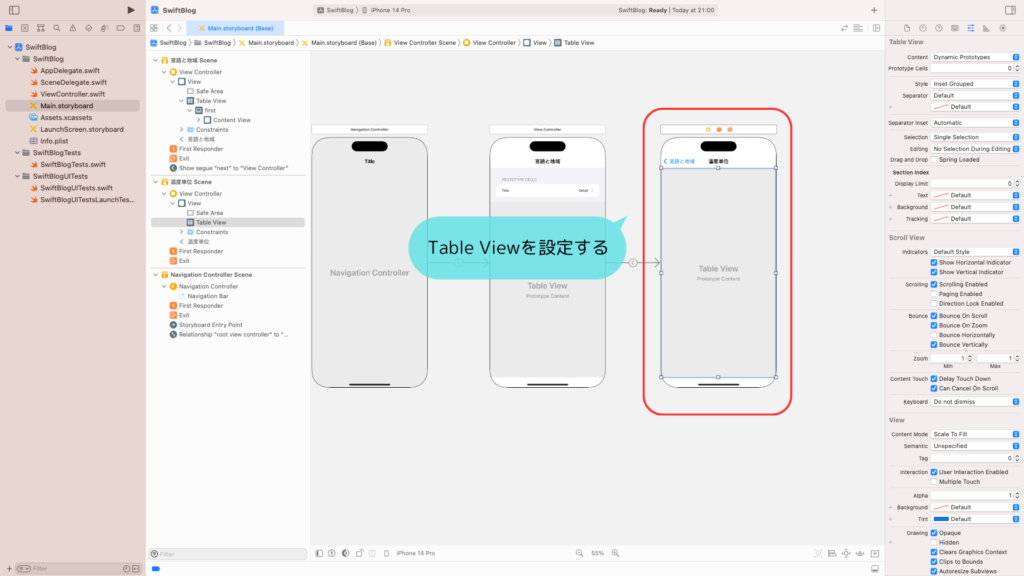
1画面目と全く同様に、Table Viewの設定を行います。
Library から Table Viewを検索し、View Controller上へ配置します。
配置したTable ViewへAutoLayoutの制約をつけます。こちらも、1画面目と同様、上下左右全てスペース0にして、画面いっぱいに広げましょう。
また、配置したTable Viewを選択して、Attribute Inspectorを開き、Styleを「Inset Grouped」にしましょう。
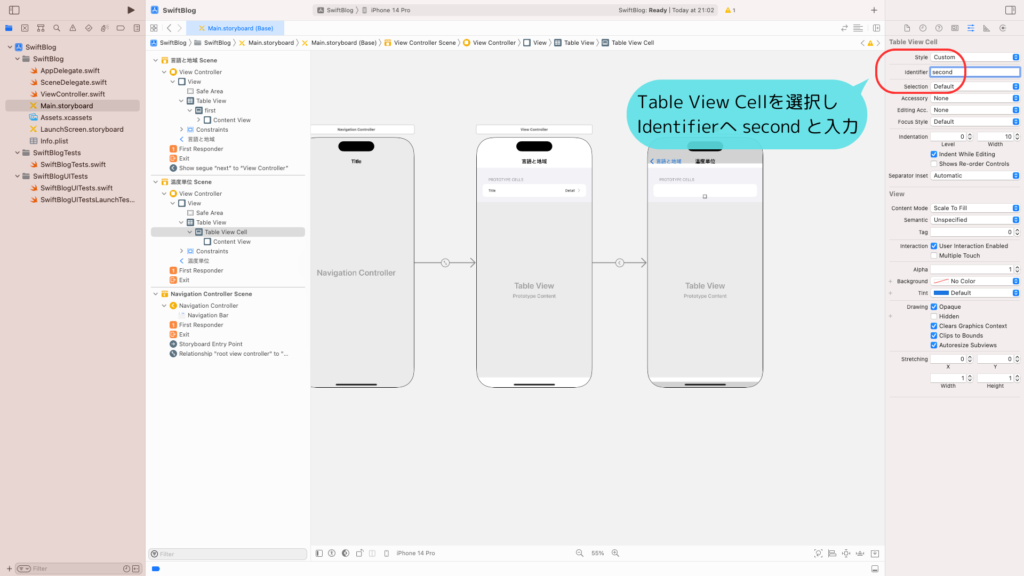
Library から Table View Cellを検索し、Table Viewの上へ配置しましょう。

配置したTable View Cellを選択して、Attribute Inspectorを開きましょう。
Identifierへ「second」と入力します。
これで画面の準備は完了です!
プログラムを作る
画面が準備できましたので、次はプログラムを作っていきましょう。
以下の順序で作っていきます。
- 1画面目用のプログラムを作る
- 2画面目用のプログラムを作る
- プログラムとStoryboardを紐づける
1画面目用のプログラムを作る
まずは、1画面目用のプログラムを作りましょう。
1画面目用のView Controllerを開きます。
以下のようにプログラムを書きましょう。
import UIKit

class ViewController: UIViewController, UITableViewDelegate, UITableViewDataSource {

    @IBOutlet var tableView: UITableView!

    // セルに表示する項目
    let choices = ["温度単位"]
    var choiceItem = "摂氏(°C)"

    override func viewDidLoad() {
        super.viewDidLoad()
        // Do any additional setup after loading the view.
        tableView.dataSource = self
        tableView.delegate = self
    }

    // セルの情報を設定する
    func tableView(_ tableView: UITableView, cellForRowAt indexPath: IndexPath) -> UITableViewCell {
        let cell = tableView.dequeueReusableCell(withIdentifier: "first", for: indexPath)
        cell.textLabel?.text = choices[indexPath.row]
        cell.textLabel?.font = UIFont.systemFont(ofSize: 16)
        cell.detailTextLabel?.text = choiceItem
        cell.detailTextLabel?.font = UIFont.systemFont(ofSize: 16)
        return cell
    }

    // 戻るから遷移した場合の処理
    override func viewWillAppear(_ animated: Bool) {
        tableView.reloadData()
    }

    // セルタップ時の処理
    func tableView(_ tableView: UITableView, didSelectRowAt indexPath: IndexPath) {
        tableView.deselectRow(at: indexPath, animated: true)
        performSegue(withIdentifier: "next", sender: nil)
    }

    // 遷移時処理
    override func prepare(for segue: UIStoryboardSegue, sender: Any?) {
        if segue.identifier == "next" {
            let secondViewController = segue.destination as! SecondViewController
            secondViewController.choiceItem = choiceItem
        }
    }

    // 各セクションのセル数
    func tableView(_ tableView: UITableView, numberOfRowsInSection section: Int) -> Int {
        return  choices.count
    }

    // セクション数
    func numberOfSections(in tableView: UITableView) -> Int {
        return 1
    }

}

2画面目用のプログラムを作る
続いて、2画面目用のプログラムを作りましょう。
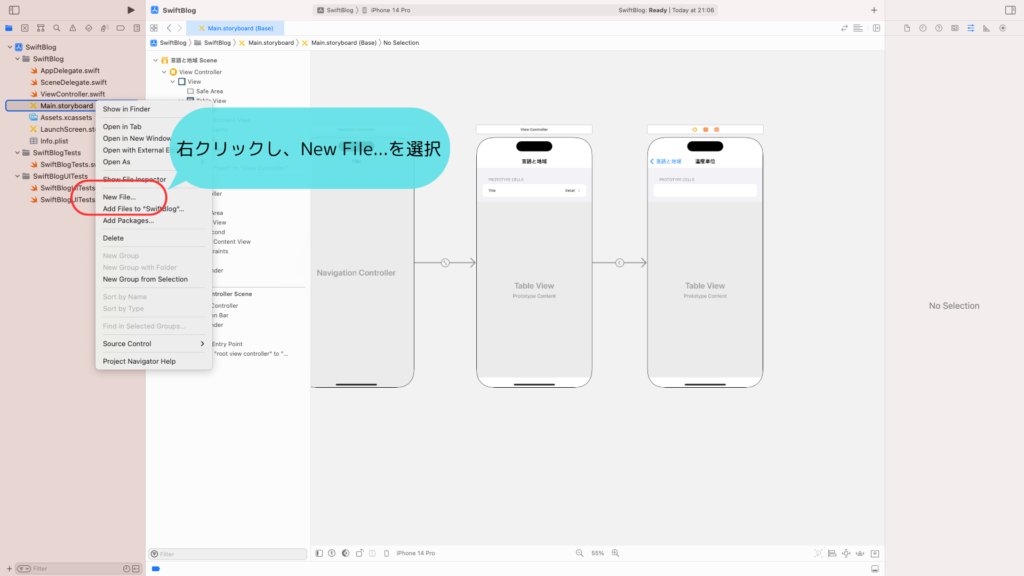
まず、2画面目用のSwiftファイルを作成しましょう。
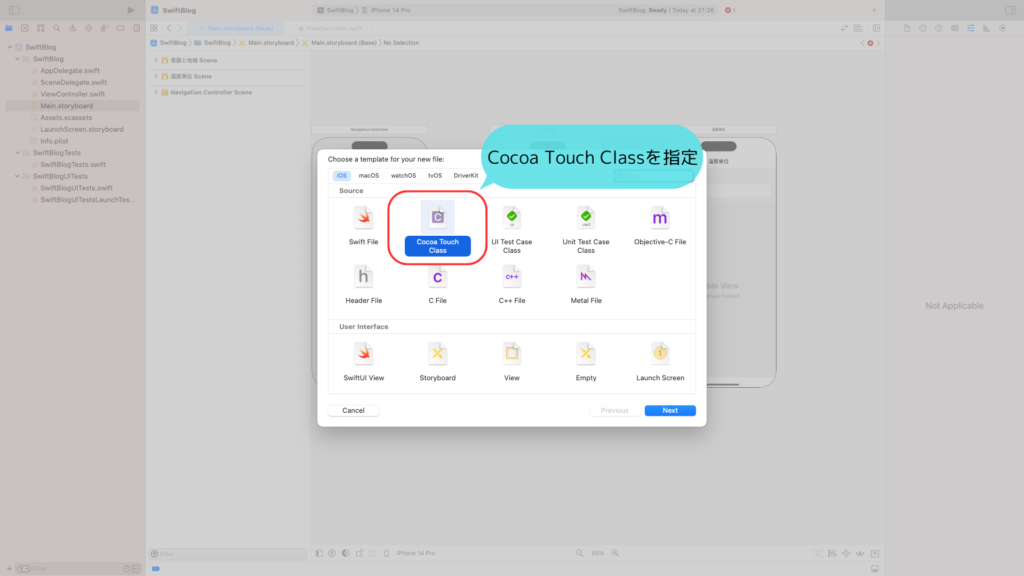
Project Navigatorで右クリックし、New File…を選択します。
Cocoa Touch Classを選択し、Nextを押します。
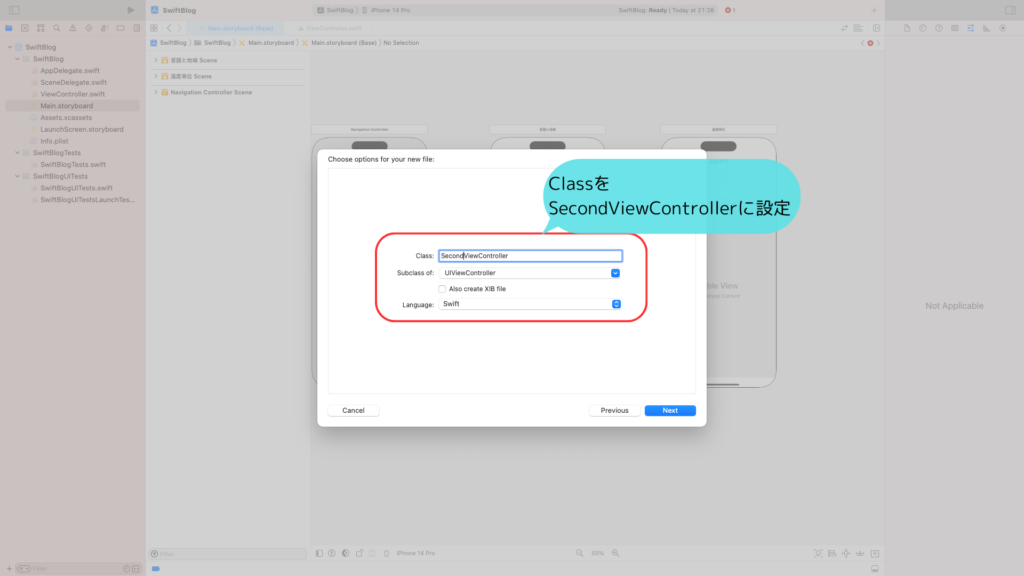
Class名はSecondViewControllerにしましょう。
あとは、以下の画像の通り設定し、Nextを押します。
保存場所を指定し、createをクリックすればOKです。
作成したプログラムに、以下のように書きましょう。
import UIKit

class SecondViewController: UIViewController, UITableViewDelegate, UITableViewDataSource {

    @IBOutlet var tableView: UITableView!

    // 選択肢
    let choices: [String] = ["摂氏(°C)", "華氏(°F)"]

    // 選択中項目
    var choiceItem: String!

    override func viewDidLoad() {
        super.viewDidLoad()
        // Do any additional setup after loading the view.
        tableView.dataSource = self
        tableView.delegate = self

        let button = UIButton(type: .system)
        button.addTarget(self, action: #selector(back(_:)), for: .touchUpInside)
        button.setTitle("言語と地域", for: .normal)
        button.setImage(UIImage(systemName: "chevron.backward"), for: .normal)
        button.titleLabel?.font = UIFont.systemFont(ofSize: 16)
        button.imageEdgeInsets = .init(top: 0, left: -8, bottom: 0, right: 0)
        navigationItem.leftBarButtonItem = .init(customView: button)
    }

    // 前の画面に戻る処理
    @objc private func back(_ sender: Any) {
        let nc = self.navigationController!
        let vc = nc.viewControllers[nc.viewControllers.count - 2] as! ViewController
        vc.choiceItem = choiceItem

        navigationController?.popViewController(animated: true)
    }

    // セルの情報を設定する
    func tableView(_ tableView: UITableView, cellForRowAt indexPath: IndexPath) -> UITableViewCell {
        let cell = tableView.dequeueReusableCell(withIdentifier: "second", for: indexPath)
        cell.textLabel?.text = choices[indexPath.row]
        if (choices[indexPath.row] == choiceItem) {
            cell.accessoryType = .checkmark
        }
        return cell
    }

    // セルタップ時の処理
    func tableView(_ tableView: UITableView, didSelectRowAt indexPath: IndexPath) {
        let cells = tableView.visibleCells
        for cell in cells {
            cell.accessoryType = .none
        }

        choiceItem = choices[indexPath.row]

        let cell = tableView.cellForRow(at: indexPath)
        cell?.accessoryType = .checkmark
        tableView.deselectRow(at: indexPath, animated: true)
    }

    // 各セクションのセル数
    func tableView(_ tableView: UITableView, numberOfRowsInSection section: Int) -> Int {
        return  choices.count
    }

    // セクション数
    func numberOfSections(in tableView: UITableView) -> Int {
        return 1
    }
}
プログラムとStoryboardを紐づける
さあ、いよいよ最後の作業です。
作成したプログラムと、Storyboardの各要素を紐づけましょう。
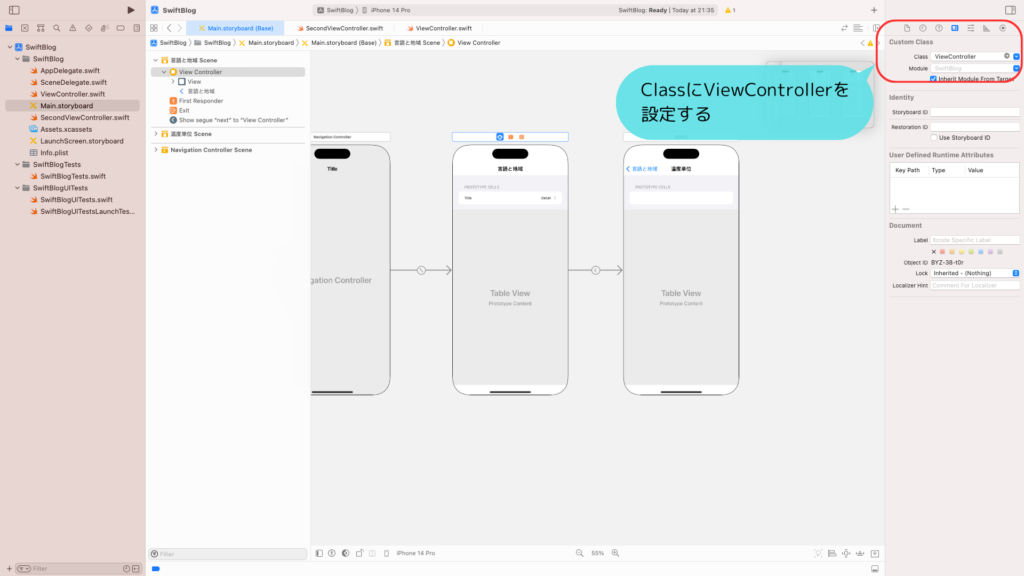
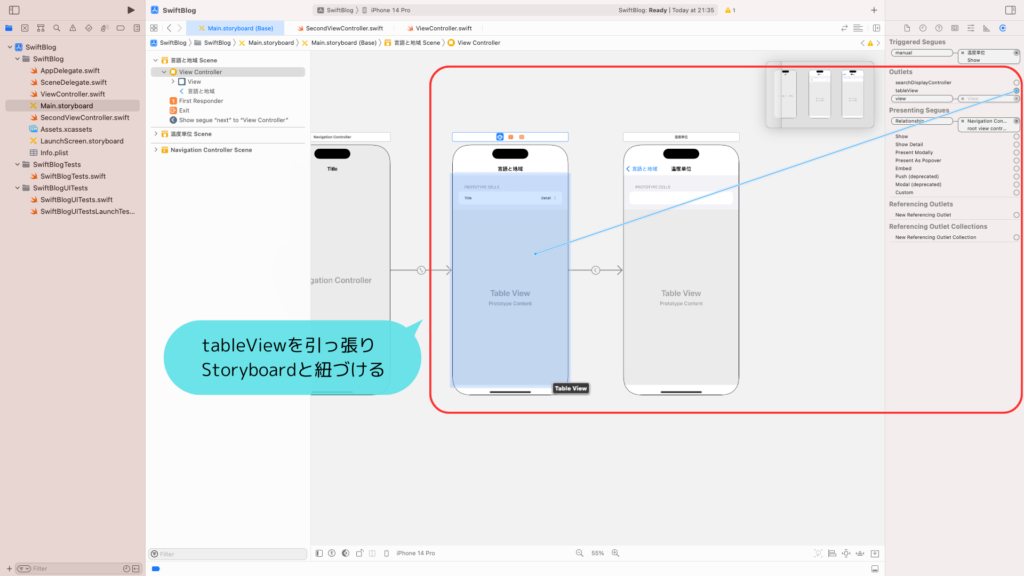
1つ目のView Controllerを選択し、Identity Inspectorを開きます。
Classに、ViewControllerを設定しましょう。
Connections Inspectorを開きましょう。
tableViewを引っ張りStoryboard上のTable Viewと紐付けます。
2つ目のView Controllerを選択し、Identity Inspectorを開きます。
Classに、SecondViewControllerを設定しましょう。
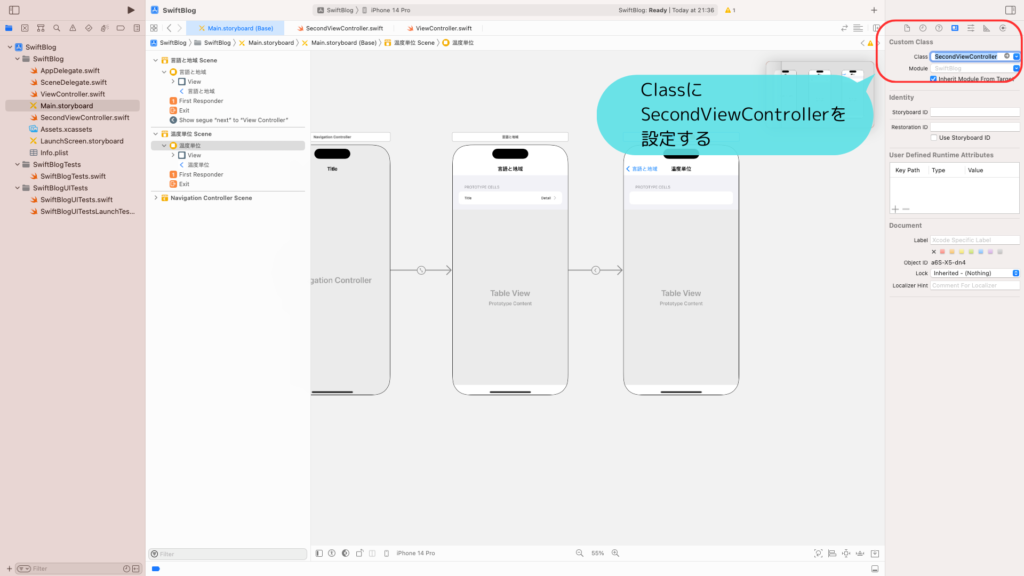
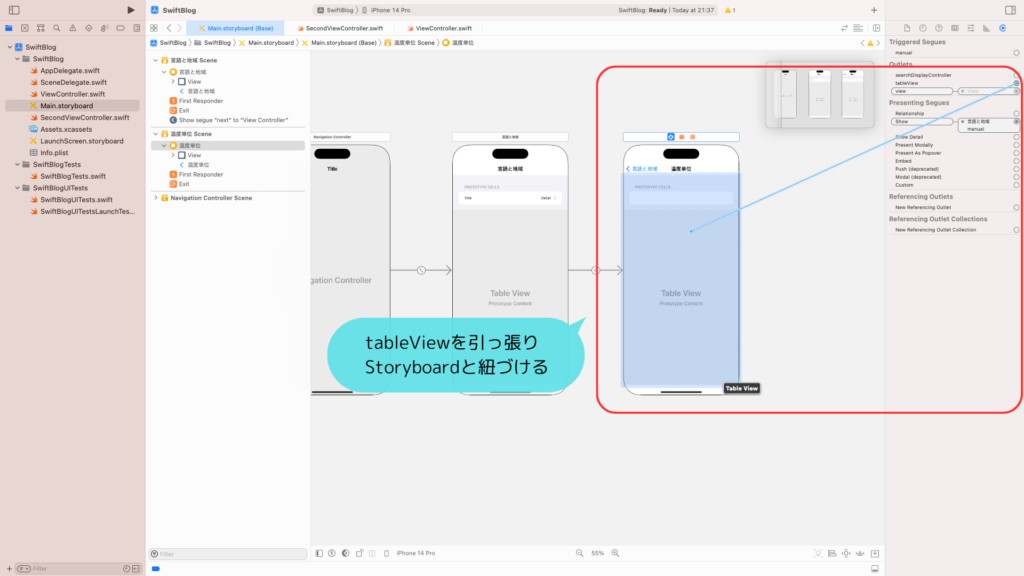
Connections Inspectorを開きましょう。
tableViewを引っ張りStoryboard上のTable Viewと紐付けます。
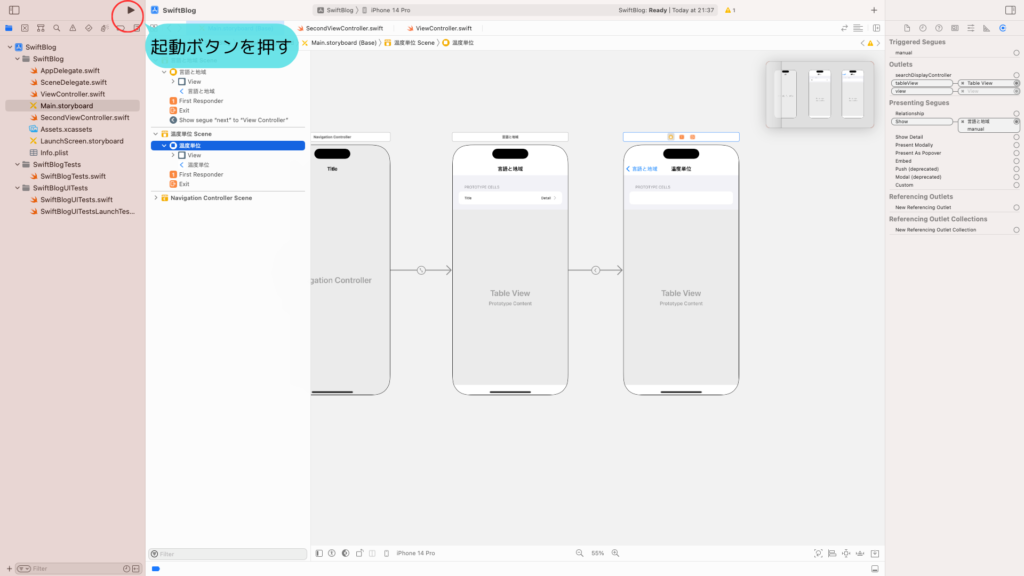
これで全て完成です!
動作確認をする
ようやく完成しました!
早速、動作確認をしてみましょう。
左上の起動ボタンを選択し、シミュレータを起動しましょう。
以下のように、期待通りの操作ができれば、成功です!
これでこの記事は終わりです!お疲れ様でした!